
Emotion Recognition with Raspberry Pi
I utilized a convolutional neural network and OpenCV to perform emotion recognition on human faces with a Raspberry Pi.
| Engineer | School | Area of Interest | Grade |
|---|---|---|---|
|
Washieu A. |
The Browning School |
Machine Learning and Computer Vision |
Incoming Sophmore |
FINAL MILESTONE
My final milestone involved implementing the machine learning model that I had trained into an application. The basis of the application is to recommend Spotify playlists to users depending on the emotion that the user is feeling based on the image that was taken of their faces.
To build the application, I used Tkinter, a library in Python that helps users build graphical user interfaces. Alongside Tkinter, I also needed to following libraries: OpenCV (for video streaming and image preprocessing), NumPy (to perform mathematical operations), Pillow (for image preprocessing), ImUtils (for image preprocessing), Tensorflow (for machine learning).
Once I had finished the simple photo-booth application, I now needed to write a script that would take the image that the user took and perform machine learning on it. However, before passing the image to the machine learning model, I would have to pre-process the image.
For this particular machine learning model, I trained it on the FER2013 dataset, which contained 48px * 48px grayscale images. If the model would be told to predict an image that does not have the same dimensions (48, 48,1), the model would not be able to work. Thus, using OpenCV, Pillow, and ImUtils, I wrote a function that transformed the image into being a grayscale, 48px * 48px image.
Now that I had a pre-processing function, I needed to write another function that took the pre-processed image and had the model predict the emotion within the image. Using Tensorflow’s built-in load_model function, I loaded the quantized model onto the script. Then, I used predict_classes function (built-in Tensorflow) to predict the emotion on the pre-processed image. However, as with any image classification problem, a softmax activation layer is necessary. This meant that I had to use NumPy’s argmax function to replicate the softmax activation layer that the model would’ve had while training. This allowed the model to provide me with accurate results.
I wrapped the pre-processing and model-predicting functions in a Python class and called them in the script where I had placed my application.
Moving forward, I hope to further advance this project by making my own recommendation system and recommend even more things based on one’s emotion.
To begin my application, I first needed to build a simple application that would take in a live video stream from the PiCamera and stream it to the application. Then, when a button (that says “Take a Picture!”) is pressed, the application would take an image from the live stream and save it to the user’s desired folder. Please look at the image below for an image of the application.
I used the emotion that the model returned to provide the user with a playlist from Spotify that would best fit their mood. If the person was happy, the application would choose from a list of happy playlists. If the person was sad, the application would choose from a list of sad playlists. If the person was neutral, the application would choose from a list of neutral playlists. Then, I used the built-in web-browser library in Python and a Tkinter button to open the Spotify playlist in the user’s browser. For a demo of this application, please watch the video provided on your left. For an image of this application, please look at the image provided below.


SECOND MILESTONE
My second milestone involved training a machine learning model to identify facial emotions. As with most supervised machine learning projects, a dataset is necessary. For this project, I used the FER-2013 dataset. The FER-2013 dataset contains over 34,000 images. The dataset is in the .csv format and contains the pixel values for each image, which are in a 48×48 format. Each image contains one of these seven emotions: ‘anger,’ ‘disgust,’ ‘fear,’ ‘happiness,’ ‘sadness,’ ‘surprise,’ and ‘neutral’.
For this project, I identified three main components: data pre-processing, machine learning, and model analysis. To complete these three main components, I needed the following libraries: NumPy (for linear algebra), Pandas (data pre-processing), MatPlotLib (data plotting), SciKit-Learn (for data pre-processing and machine learning), and Tensorflow/Keras (for machine learning). I also needed Anaconda, a distribution of Python. Anaconda allows users to utilize a virtual environment. A virtual environment would allow me to utilize a GPU (Graphical Processing Unit) and to install and only maintain the libraries that I need for my specific project. A virtual environment would make sure that the libraries that I need for this project would be able to work without any fear of it breaking. Along with Anaconda, I also used Jupyter Notebook. Jupyter Notebook is an open-source web application that allows users to perform live data-visualization and run certain blocks of code at a time.
Now that I had my new dataset (refer to the left), I needed to split the data into a train and test set. The training set would be the data that the model trained on. The testing set would be the data the model would be tested on. Using SciKit-Learn’s train-test-split function, I split the dataset into an X_train, y_train, X_test, and y_test.
After splitting the dataset into a train and test split, I began to construct my machine learning. I decided to build a convolutional neural network because of its high accuracy when working with image classification problems. To construct my model’s architecture, I decided to use Tensorflow/Keras. To build a convolutional neural network based on the FER-2013 dataset, I would need to build a sequential model and use the following layers: two-dimensional convolutional layers, two-dimensional max-pooling layers, dense layers, flattening layers, and dropout layers. A sequential model takes in one input tensor and outputs one tensor. This type of model allows for one image to be inputted to the layer and for the model to predict and output the class that it thinks it belongs to. A two-dimensional convolutional layer passes filters through an image and preserves the spatial relationship between image pixels by learning image features. A two-dimensional max-pooling layer calculates the maximum value in each image filter that the convolutional layer places to highlight the most present feature in the image. In terms of a convolutional neural network, a dense layer will often appear as the last layer in the network. The layer will take the input tensor for the image, perform a mathematical operation, and return a discrete vector or distribution that matches your class. In terms of a convolutional neural network, a flatten layer creates the output of a convolutional layer into a single-long feature vector, which can then be inputted into the dense layer. A dropout layer turns off certain neurons in a layer to prevent overfitting within a network. Overfitting occurs when the error on the training set is driven to a very small value but the error on new data is very large.
After training the network for 100 epochs (iterations) on my NVIDIA CUDA-Enabled GPU, I would be able to move onto analyzing my model (refer to the left).
Now that the model has been built, I would need to perform quantization on the model. Quantization is a conversion technique that reduces the size of the model, which allows for better overall performance on lower-performance devices, like the Raspberry Pi. Using Tensorflow’s built-in TFLiteConverter function, I was able to quantize the model. I performed dynamic range quantization, which quantized the weights of the model from floating-point values to integers, which has 8-bits of precision.
Now that I have built a model that will work for classifying emotions, I will now move on to building a GUI (graphical user interface) and a recommendation system to recommend certain things based on one’s emotion.
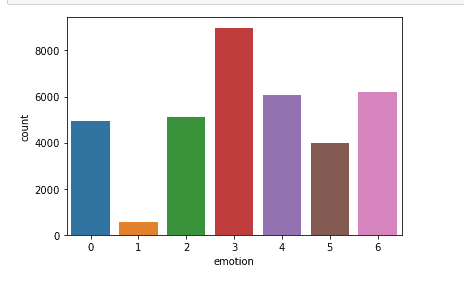
As I began to pre-process my data, I noticed that there was an imbalance in the dataset. Using MatPlotLib and Pandas, I quickly realized that the three most common emotions within the dataset were ‘neutral,’ ‘happiness,’ and ‘sadness.’ In the image below, a graph of the total number of emotions per image is shown. 0 is classified as ‘anger.’ 1 is classified as ‘disgust.’ 2 is classified as ‘fear.’ 3 is classified as ‘happiness.’ 4 is classified as ‘sadness.’ 5 is classified as ‘surprise.’ 6 is classified as ‘neutral.’
The other four emotions in the dataset were very hard to find. At this time, I had also realized that to accurately predict multiple emotions would be quite difficult because everyone displays their emotions very differently. With the lack of images that the FER-2013 dataset had in terms of emotions other than ‘neutral,’ ‘happiness,’ or ‘sadness,’ I decided to shorten the dataset. The new dataset that I had created only contained the following three emotions: ‘neutral,’ ‘happiness,’ ‘sadness.’
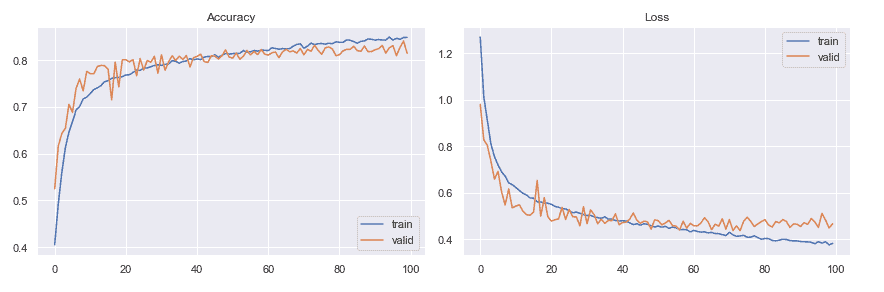
According to the image below, my model performed very well. The accuracy value over each epoch increased with the loss value decreasing over each epoch.
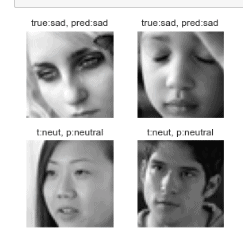
Although the performance of the model turned out to be numerically amazing, I still wanted to analyze the model with the testing set. Using Tensorflow/Keras’ built-in predict_classes function, I inputted images from the testing set into the model. Along with using Tensorflow/Keras, I also used MatPlotLib to plot the images, the true emotion of the image, and the predicted image of the model. According to the image below, the model predicted each emotion accurately.
FIRST MILESTONE
My first milestone involved setting up the Raspberry Pi and performing basic facial recognition using a Haar-Cascade classifier. I used a Raspberry Pi imaging software to image Raspberry Pi OS onto a Micro SD Card. Once I had imaged the software, I was able to use the Raspberry Pi and install any necessary dependencies that I would need for my project. One of the most necessary dependencies that I needed was OpenCV, a computer vision library. Using the provided Haar-Cascade model files from the OpenCV GitHub repository (which were formatted in the .xml file format), which are a set of pre-trained machine learning models, I was able to utilize Python to perform facial recognition using the Raspberry Pi and its camera. Now that I have performed basic facial recognition, I will now move forward by performing emotion detection with a dataset.