Sign Language Detector
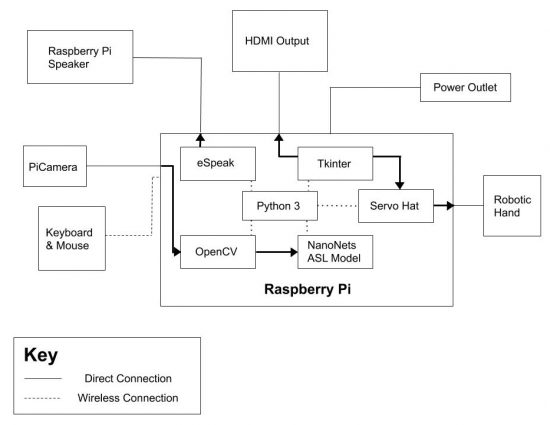
I created a sign language detector on the Raspberry Pi that uses TensorFlow and OpenCV to detect the different letters of the American Sign Language. Other additions include a speaker that says the letter according to the sign and a robotic hand that can show the different signs.
| Engineer | School | Area of Interest | Grade |
|---|---|---|---|
|
Mindy K. |
Folsom High School |
Computer Science |
Incoming Junior |
DEMO
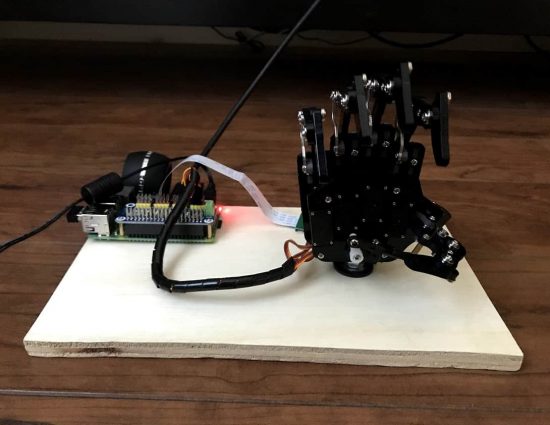
My final milestone was adding on the robotic hand to my project and getting the robotic hand GUI to fit nicely with the rest of my project. When my robotic hand arrived in the mail, I read up on the manual on the different functions in the Servo Hat demo code. I had to learn a bit about servos, and also about python since there were parts of the code I needed to work around in order to use the demo code in another file. I edited the code so pressing a button would call the function for the servos to move from the position they started at. This tkinter GUI system was easy to create, but the harder part was attempting to implement the robot hand GUI with the camera GUI for detecting the different sign language. Thus, on the camera GUI, I created a tkinter menubar that could open a window to the robothand GUI. I did want to create a frame so the robot hand GUI would open on the same window, but that proved to be extremely difficult and time consuming as that would require editing almost all of my code for the sign language detection. Finally, I used the functions I created to move each of the fingers into their respective positions every time the respective button is clicked. I attached the robotic hand and the Raspberry Pi to a piece of wood, and I was finally done with my project!
FIRST MILESTONE
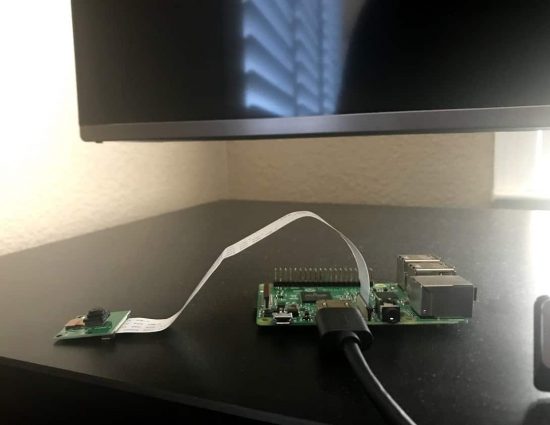
My first milestone was getting the object detection code up and running on the Raspberry Pi. I first put the microchip into the SD card, which was inserted into my computer. Then, I downloaded the Imager.exe file that contained the operating system for the RaspberryPi. That same microchip was placed into the Raspberry Pi. Next, I placed the mouse receiver into one of the USB ports in the Raspberry Pi. I proceeded to connect the Raspberry Pi to my TV with the HDMI adapter, the power cord to an outlet, and the PiCamera to the Raspberry Pi. The Raspberry Pi popped up on the screen, allowing me to configure the settings to my preference. When I had finally finished setting up the Raspberry Pi, I got to test out the PiCamera to see if it is working. After my Raspberry Pi was ready, I decided to do some research about object detection. I used NanoNets at first to understand some of the general concepts about how object detection works and such, but I found out that NanoNets is a bit outdated to serve my purposes. I later focused on a tutorial I found on github that walked me through a tutorial on how to get object detection code on the Raspberry Pi. I did run into a couple problems while attempting to download OpenCV, but everything else went smoothly. This code required me to download both TensorFlow and OpenCV, as well as a ready-to-use model that was already trained for me. When I finally finished the tutorial, moving the PiCamera around made the screen show the respective boxes and identify everyday objects with ease.
SECOND MILESTONE
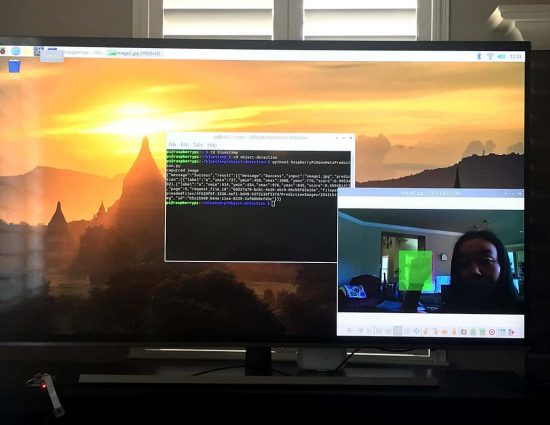
My second milestone was training my own model based on sign language letters and implementing it into my object detection code. I first spent quite some time on doing research and building up my knowledge on machine learning and neural networks using numerous articles and youtube videos. Afterwards, I also went through the object detection code in order to fully understand what was going on and what the concepts of the code were. One thing that I found interesting was how everything about machine learning, especially the neural networks, which made machine learning a little less daunting and impossible. Before, I said that NanoNets was outdated, but I learned that I could build my own models and implement the API easily, so I created a sign language model that identifies letters “A” & “B” and implemented it on the RaspberryPi. This process made me learn how to use OpenSSH Client in order to control and use the RaspberryPi from my computer. I ran into an issue of the model predicting “B” when I held up the letter “A”, but I quickly realized that the lighting of the picture was affecting the predictions. Overall, the model was up and running smoothly, so I could add further additions to my project.
FINAL MILESTONE
My third milestone was building a GUI (graphic user interface) for the ASL Detection code and adding on a RaspberryPi speaker to implement a speech synthesizer that speaks the letters out loud. I first turned my attention towards researching tkinter, which I have used before, to create a user interface that someone can interact with to take pictures and receive the predictions. Implementing the NanoNets code to a simple GUI with a button to take a picture was not difficult, but then I decided to try and display a live preview onto my GUI window. I transferred files from my computer to the RaspberryPi using scp (secure copy), but the code ran into tons of errors, especially when attempting to implement the ASL Detection code. Many of the issues involved leading files to the correct path and using global variables. Finally, my tkinter GUI was set up and worked nicely, with an extra touch of displaying the prediction for the picture and counting down 3 seconds before taking the picture. The countdown function required a separate thread as the sleep function would affect the preview feed, which was already part of another thread. This is around the time my RaspberryPi speaker arrived, so I changed the audio settings to force the RaspberryPi to use the audio jack and found code that caused the eSpeak, a speech synthesizer, to function. This was also implemented into the tkinter GUI by saying the letter in the picture or “No Object Detected” if no object is detected.