Educational Video Game
Educational Video Game that attempts to teach the player a small part of Modern European History.
| Engineer | School | Area of Interest | Grade |
|---|---|---|---|
|
Ashwin C. |
Mountain View High School |
Computer Science |
Rising Junior |
FINAL MILESTONE
Furthermore, everytime the main player attacked the AI or the AI attacked the main player, the health for each character went down by 10. For the main player, their health was visible from a UI element but the AI’s health was controlled by a script internally. As for modifications, I aim to add more enemies and add more levels focusing on a broader range of historical events in terms of European History. The scripts ensured that the AI and the Main Player were within range of each other for combat. After 2 seconds, the AI would begin attacking the main player and once the AI’s animation for an attack was completed, the main player was animated as if it took a hit from the AI and the same vice versa.
My final milestone basically signified the fact that I had completed the game. Essentially, I just polished up a few things with the UI and AI. I added scenes to the game for a main menu, an info screen, a game over screen, and a game complete screen. These scenes required a scene manager script which took in button inputs and loaded up the next scene. The last thing which was added was a combat system. I had to create 3 new scripts for this system to manage the health of the main player and the AI as well as animating the two characters and making the interaction seem somewhat realistic.
THIRD MILESTONE
The next thing I was able to do was add the AI. I needed to use the navmesh which is a built-in feature from Unity. Fortunately, the animation pack that I was using worked with the navmesh. Making the navmesh was not the hard part as I only had to do a few things like define what was walkable and what was not and create a script that set the target of the AI to the main player. There was one issue that I encountered during the animation process. Although the AI followed the main player, the AI only walked towards my main player. I spent 3 days trying to find a solution looking through the source code and when I did, all I had to do was change a value in the navmesh component in Unity’s inspector tab(taking a whopping 2 seconds). After I finished with the basic integration of the AI, I began adding UI elements such as text to the screen. With my third milestone complete, I only have to add a combat system and scenes to the game.
For my 3rd milestone, I was able to add a collision feature into the game to prevent the main player from clipping through the church and the houses. This was done through using the main player’s mesh collider and a script. Essentially, the script takes the player’s mesh collider and check if that collider hits any other collider when playing. Because almost every game object had a collider, including the houses and the walls of all the buildings, if the player attempted to run into a house or a wall, the player’s mesh collider would detect that it has hit and interacted with another collider and notify the script. The script would take the last known position of the player without any collision detected and set the current’s player position to that. So whenever the player hit a wall, the script would prevent the player from clipping through because it would set the player’s position back.
SECOND MILESTONE
The animations worked and the first major part of this milestone was finally complete. The next part was to work on the camera. For this, I added a camera component and wrote a script. Everything worked except for the fact that the camera would not move on the y-axis. After many hours of searching, I finally decided to ditch the script and use the cinemation tool installed within Unity by default. I customized their camera asset until it worked the way I wanted it to(very professionally working btw). However, the camera was still not changing on the y-axis. I decided to go into the input manager and change the input from mouse movement to keys. It worked then so I thought it was an issue with my mouse but after giving the input manager a further look, it seemed that I set the axis of the input to a joystick axis rather than the Y-axis. After a quick change to the y-axis and a swap back to mouse movement, the camera finally began to move on the y-axis. At this point, my second milestone was reached however I wanted to add camera collision so that it would not clip through the walls of the church and the houses on the map. This worked for the walls and houses that had a rigidbody component and somewhat of a collision system but not for all. Nevertheless, I had hit my second milestone with only a few bugs to fix for the third milestone.
My second milestone was to add animation and work with the camera movement. In other words, add somewhat of a resemblance of a video game. Since the animations are binded to the correct key binds, the player is now able to use their legs and arms to fight but more importantly the player can now navigate themselves through the map. The running animation is smooth and very natural and the player is given the appropriate speed making it look very realistic. For the animation, I used the free version of a mecanim animation pack which only came with certain animations but it was sufficient enough for my game. After the first install, the animations just did not work. The player model would fall through the ground because it was not able to detect that there was in fact a ground beneath the player.The reason for this was due to the fact that the layer, the player, and the player’s collision capsule were not set to the same layer. After I created a layer and set the proper features accordingly, the player went flying off into space. At this point, I decided to reinstall and I believe this solved all the issues. After setting the same layers, and setting the proper value of gravity over the world, the player was finally not following through the world or going off into space.
FIRST MILESTONE
This was entirely done in unity with no external tools, assets, or any dependencies. Shortly after, I acquired the medieval interiors asset pack to decorate the insides of the church. This was the longest and most tedious part of the map development process. Using the assets took a while in the beginning but I was able to significantly decrease the time of creating the map by using the scale tool. After the church was completed, I needed the knights low poly asset pack to create the houses and castle to populate the rest of the terrain. This was where I hit my first and only roadblock. I was unable to purchase this pack from the asset store that day, consequently that day was somewhat of a waste. I tried again the following day and met success this time. After a few short hours of scaling and positioning, the map was completed and I reached my first milestone. With the map completed, the goal from here will be to add functionality to the camera, animate the characters, and begin programming the various features of the game. In my opinion, this will be the milestone in which I will learn and complete the most.
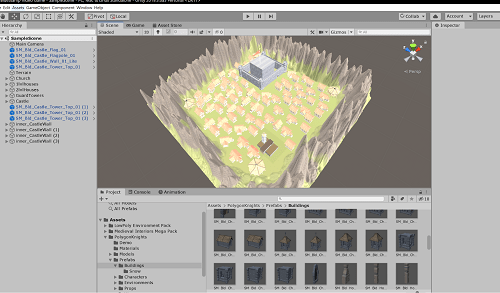
I have successfully achieved my first milestone. I finished the very first functional version of the game’s world or the map. This includes the castle, the houses, and the church’s interiors all completed. As of right now, there is no way to truly interact with the game. If the game were to be ran, you’ll be greeted with a static camera unable to rotate or move, but you would see a portion of the map. This map will be later used and the player will have to interact with it. I began by creating the land or the terrain. As any other game, I had to first make the boundaries which I was able to do with Unity’s built-in terrain tool. If you look at the image posted, you will see ridges on the edges of the map which mark the player’s boundaries.
RGB NIGHT LIGHT
My starter project was the RGB night light which is exactly what it sounds like. It is a simple bulb that turns on when it detects that it is night. The photoresistor determines the light intensity in the environment. The data is sent back through another jumper wire to an analog input on the redboard from which the code is able to access and interact with this data. The code uses the value returned from the photoresistor and compares it to a certain threshold. If the value returned is less than the threshold, the redboard passes the current to the potentiometer. Based on the potentiometer’s position, a certain value is returned to the redboard in an analog input. The code uses this value from the potentiometer to set the color settings for the led hence creating that ‘RGB’ light. As most things, when I first finished connecting the resistors, jumper wires, and the various other elements, the night light did not work. After about an hour’s worth of debugging, a part of the problem resulted from a few incorrect inputs and output slots. However the main issue was the fact that the common pin of the LED light was connected to the ground rail of the breadboard. A quick switch to the 5V rail fixed the problem and the night light worked exactly as expected. Another problem was the fact that the RGB led was not really RGB. Because the led light used was a cathode, it did not follow the rainbow color scheme as the sample source code assumed. As a result, I had to not only modify the code to the RGB color scheme but I also had to invert the colors to get a truly rainbow RGB light.